Overview
At WP Hosting, you can publish your staging site to your live domain in three ways: by using the temp URL to live domain method, a cloning plugin, or the built-in cloning tool available in your cPanel account, known as WordPress Management (formerly WP Toolkit). In this guide, we’ll walk you through each method. The most suitable option will depend on your specific needs and which hosting plan you’re using.
WordPress Management (WP Toolkit) clone tool feature is available only on selected hosting plans — starting from the Business plan and above for WordPress Hosting, across all WooCommerce Hosting plans (Cart, Store, Commerce, and Commerce+), and on Enterprise Hosting plans with WHM/cPanel servers.
Method 1: temp URL to live domain method
If your hosting plan is Micro or Startup, you can use the temporary URL to host your staging site. Once you’re ready to go live, you can follow the process to publish it from the temporary URL to your live domain.
When you purchase a hosting plan, you’ll receive a welcome email with instructions on how to access your temporary URL, look for the ‘Using a Staging Environment’ section. It should look something like this:
- Staging Site: http://username.staging.server-xxxx.wphosting.com.au
- Staging Dashboard Login: http://yourwebs.staging.server-xxxx.wphosting.com.au/wp-login.php
Take note of your staging site URL, as you’ll need to use it in the following lines of code. Be sure to replace the placeholder with the actual staging URL you received:
define('WP_SITEURL', 'http://username.staging.server-xxxx.wphosting.com.au');
define('WP_HOME', 'http://username.staging.server-xxxx.wphosting.com.au');
These lines force WordPress to load from the temporary URL.
Copy and paste these lines of code into your wp-config.php file, located in your site’s root directory. e.g. public_html/wp-config.php.
To get started with your site using the temporary URL
1. First, login to your cPanel
2. Then, go to the public_html/root directory of your site via cPanel File Manager or access it via FTP.
3. Finally, open and edit the wp-config.php file and paste the two lines of code mentioned above.
To publish your site to your live domain: steps to go live
1. Edit the wp-config.php file
To access your WordPress files via cPanel File Manager or FTP. And the path to your wp-config.php file is usually located at public_html/wp-config.php.
However, if you’re working on an add-on domain (for plans higher than Startup), you’ll need to click on ‘Domains’ in cPanel, then look for the Document Root column next to your add-on domain. Clicking the path listed there will take you directly to the root folder of that domain, where its wp-config.php file is located.
2. Remove the following lines:
define('WP_SITEURL', 'http://username.staging.server-xxxx.wphosting.com.au');
define('WP_HOME', 'http://username.staging.server-xxxx.wphosting.com.au');
3. Save the file and refresh your site
WordPress will now use the domain name set in the database under Settings > General (or defined during installation).
If you still see the staging URL, make sure the WordPress Address (URL) and Site Address (URL) in your admin dashboard reflect your live domain.
Method 2: Using a WordPress cloning plugin
If you’d prefer to use a cloning plugin to publish your site to live, you can follow our help guide available here: How to clone a WordPress site using plugins
Method 3: Using cPanel’s WordPress Management tools
If you’re ready to push your staging site to the live environment, the WordPress Management (WP Toolkit) clone tool makes the staging to live process quick and simple. This guide will walk you through how to replace your live WordPress site with the content from your staging site.
Before you begin
- Ensure your staging site (e.g.
staging-9.fortestonly2.com) is fully tested. - Take a backup of both your live and staging sites, just in case you need to roll back. (You can use JetBackup 5 to create backups. Follow this guide to learn how to back up your site using JetBackup 5).
- This process will overwrite the live site (e.g.
fortestonly2.com) with your staging site’s content.
Plans with access to the WordPress Management (WP Toolkit) clone tool only
WordPress Hosting plans:
- Business
- Busines+
WooCommerce Hosting plans:
- Cart
- Store
- Commerce
- Commerce+
Enterprise Hosting plans (available only on WHM/cPanel):
- Basic
- Advanced
- Ultimate
- Extreme
Steps to publish your staging site using WordPress Management
1. Log in to your cPanel.
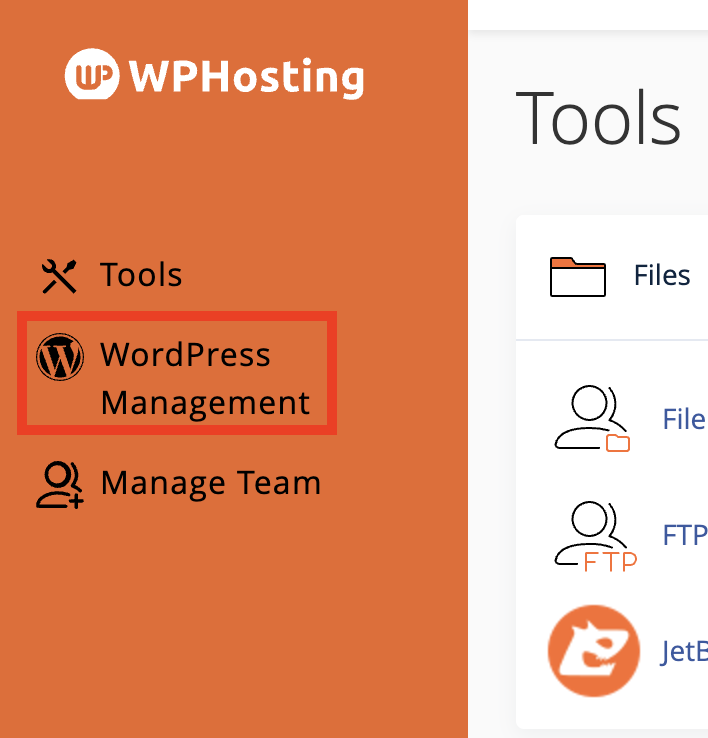
2. Seleet and open ‘WordPress Management‘.
From the cPanel dashboard, locate and click to open ‘WordPress Management‘.
3. Find your staging site.
Under the list of installations, look for staging-9.fortestonly2.com. Then, click the downward arrow symbol to expand its details.
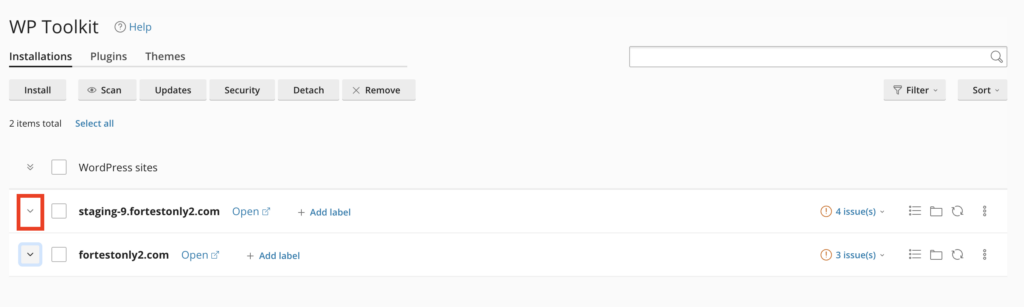
4. Click the ‘Clone‘ icon.
Next to the staging site, click the ‘Clone‘ icon to begin the cloning process.

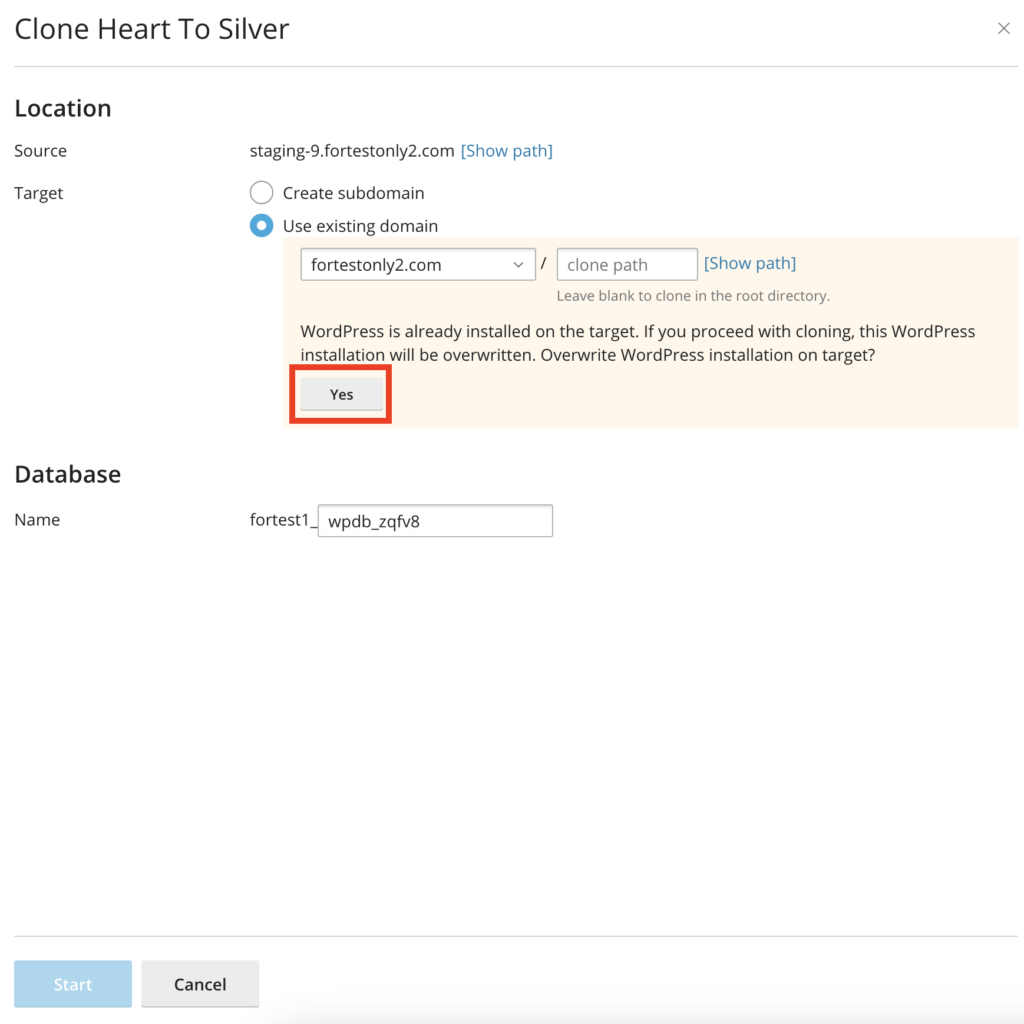
5. Choose the live domain.
In the cloning options:
- Select
fortestonly2.comas the destination domain or if you already have a WordPress installation in your live or root domain then you can just select existing domain. - Leave the path field empty so it installs directly to the root.
- Then, click ‘Yes’ if it indicates that WordPress is already installed on your live domain.
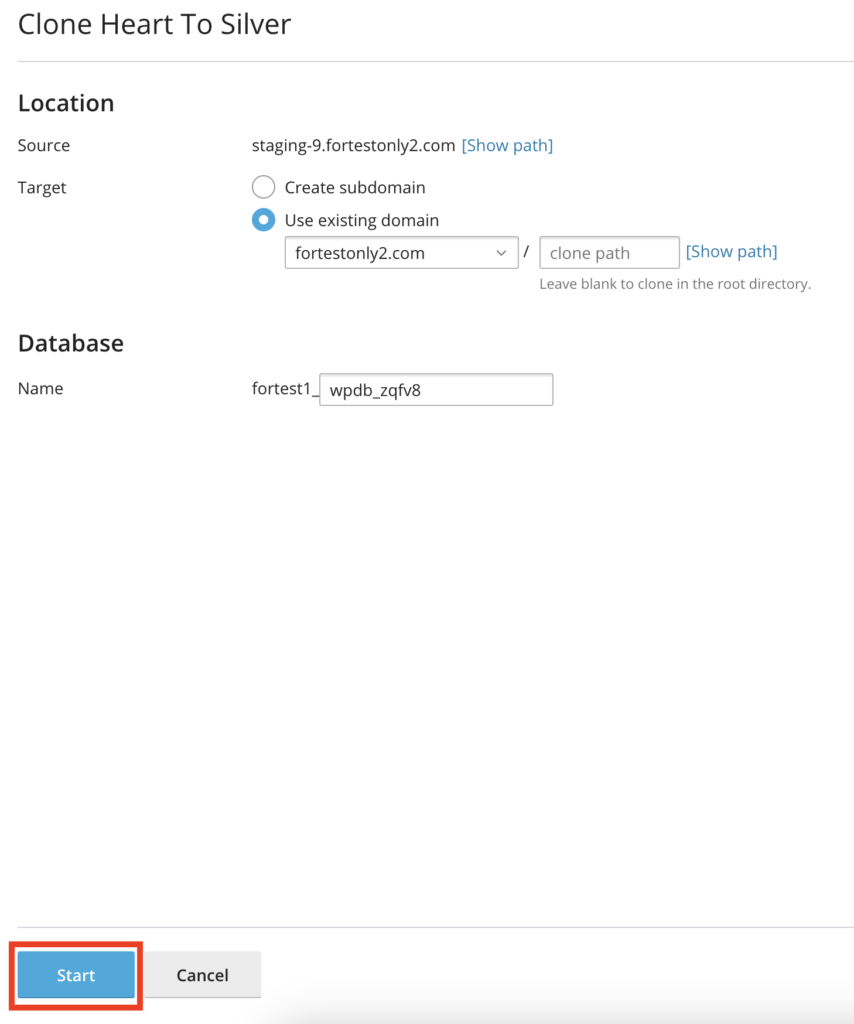
6. Start the clone.
Click ‘Start‘ to begin cloning the staging site to the live environment.
7. Refresh and turn on search engine indexing.
Open the details of your live site by clicking the ‘downward arrow.’ Then, click the ‘refresh‘ icon to update the changes and ensure your WP Toolkit dashboard is up to date. If ‘Search Engine Indexing‘ is turned off, turn it on by clicking the toggle button. Finally, log in to your live site using the same credentials as your staging site, and your site is now live.

WordPress Management (WordPress Toolkit) will copy all files, the database, and configuration from your staging site to the live domain. As a result, your current live site will be replaced with the new version. After the process finishes, a success message will appear.
After cloning: final checks
Now that your site has gone live, take a few minutes to verify everything works:
- Visit your live site domain (e.g. https://fortestonly2.com)
- Check all pages, menus, and forms
- Refresh permalinks by going to ‘Settings‘ > ‘Permalinks‘ in your WordPress dashboard. Simply click ‘Save Changes‘ to refresh them.
- Clear your browser and site cache (especially if you use a caching plugin)
Need help?
If anything doesn’t look right or you run into issues, contact our support team. We’re here to help make your staging to live process smooth and stress-free.